
Camaleon CMS can be integrated into existent Rails Project.
Note: Check here for updated install steps.
Steps to install:
-
Add camaleon_cms to your Gemfile (review github for the last stable version)
gem "camaleon_cms", '>= 2.4.3' - Only Rails 5 support (Add your your Gemfile)
In your Gemfile, change sass-rails version into '~> 5.0' (Camaleon doesn't support for sprockets >= 4 which is included in sass-rails >= 6)
Add in your Gemfile draper for Rails 5
gem 'draper', github: 'drapergem/draper'
gem 'sass-rails', '~> 5.0'
Also add this configuration to your config/application.rb
config.active_record.belongs_to_required_by_default = false -
Install the gem
bundle install -
Install the CMS (This will copy some basic templates and plugins in your project)
rails generate camaleon_cms:install - Before continue (Very Important)
- Open camaleon cms configuration in config/system.json (review and modify according your needs)
- You can customize your admin url path by "admin_path_name": "secret_admin"
- You can avoid overwrite your DB tables by adding a prefix by "db_prefix": "myprefix_"
- You can add camaleon cms within a url prefix by (all urls of camaleon will be prefixed with this value) "relative_url_root": "blog"
- You can reuse your existent user authentication to access into camaleon admin panel:
https://camaleon.website/documentation/category/139779-faqs/custom-login.html - Check full configurations here:
https://github.com/owen2345/camaleon-cms/blob/master/config/system.json
-
Generate database structure
rake db:migrate -
Start your server
rails server # and then go to your browser https://localhost:3000/ - Open a browser and navigate to https://localhost:3000 (First time will show new site form)
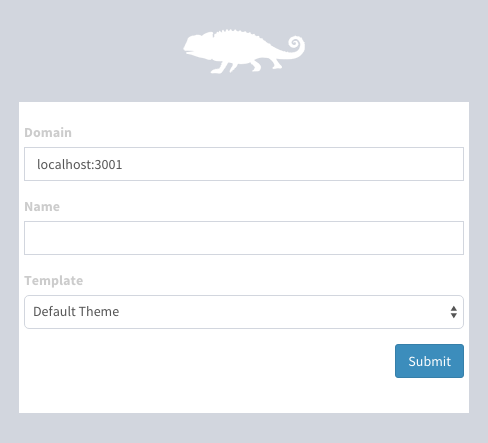
- Access information for your site
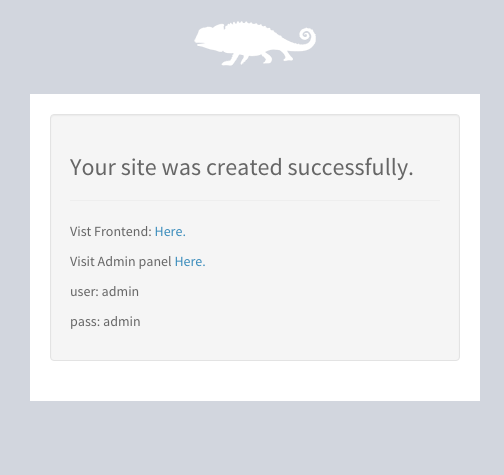
- That's it.
Created at: 18 Mar 07:59 | Updated at: 05 Jun 17:06